Monday, July 2, 2012

My little nest

Thanks everyone for the well wishes.  I'm not doing too badly because this cold has given me a couple days off work.  I have spent that time in front of the heater doing a little bit of sewing or reading those new craft books I got in the mail the other day.


This is one spot I have been hanging out.  Either watching tv or reading my 5 new craft books.  The books are fabulous.  One is Wee Wonderful's book.  It's  full of softies to make.  The other is Hop Skip Jumps softies book.  So many cute projects just asking/begging me to stop what I am doing and start something new.  I am trying to be tough and finish off some stuff that's been hanging around for ages unfinished.


I have also been nesting in front of this heater doing some crafty stuff.  Mostly I have been making a mess with bits and pieces scattered over the floor.  Also reading Melly and Me's softie book to finish off Bella Boo.


Bella Boo.  She is so sweet and a wonderful softie to make.  I used some soft flannel fabric for her body.  I found it in an op shop years ago and the scrap was too small to make any baby clothes with.  Perfect for Bella Boo.

She has gone off with my cousins little girl.  Most of my softies fly the coup really early.  I guess that's good right?  I just would like one or two for myself but can't say no to any little tacker that wants to take one home!

Gotta go and curl up on my sofa.  Hubby's putting Farscape on to watch.


Friday, June 29, 2012

Hi

I hope you are all keeping well.  I have the flu but I am doing my best to keep as many people well as I can by staying home these last few days. It's been hard especially when the postie delivered some new craft books for me to read.  

Speaking of the postie.  He is the first person I have come across in a long time who has such as strong sense of self survival.  When I told him to stay clear, as I was not only sick but felt like patient zero, he wouldn't hand me my package but placed it on the ground in front of him and quickly turned tail and ran for his delivery van.  I must look like crap.

Also a telemarketing caller rang with some scheme to sell and after I politely croaked "no" she quickly hung up.  No keeping on with the sales pitch and falling into full hostile abuse when I keep politely saying "no thanks".  I must sound a fright too.

I made this bag a while ago but only just finished it recently. 


It's a little orphan purple bag.  It has no where to go yet.  I don't why I made it really.  I think its just because I love cutting up fabric!

CraftyStacie has kindly made a tutorial for this bag on her blog and you can jump into this portal to get there and make your own.

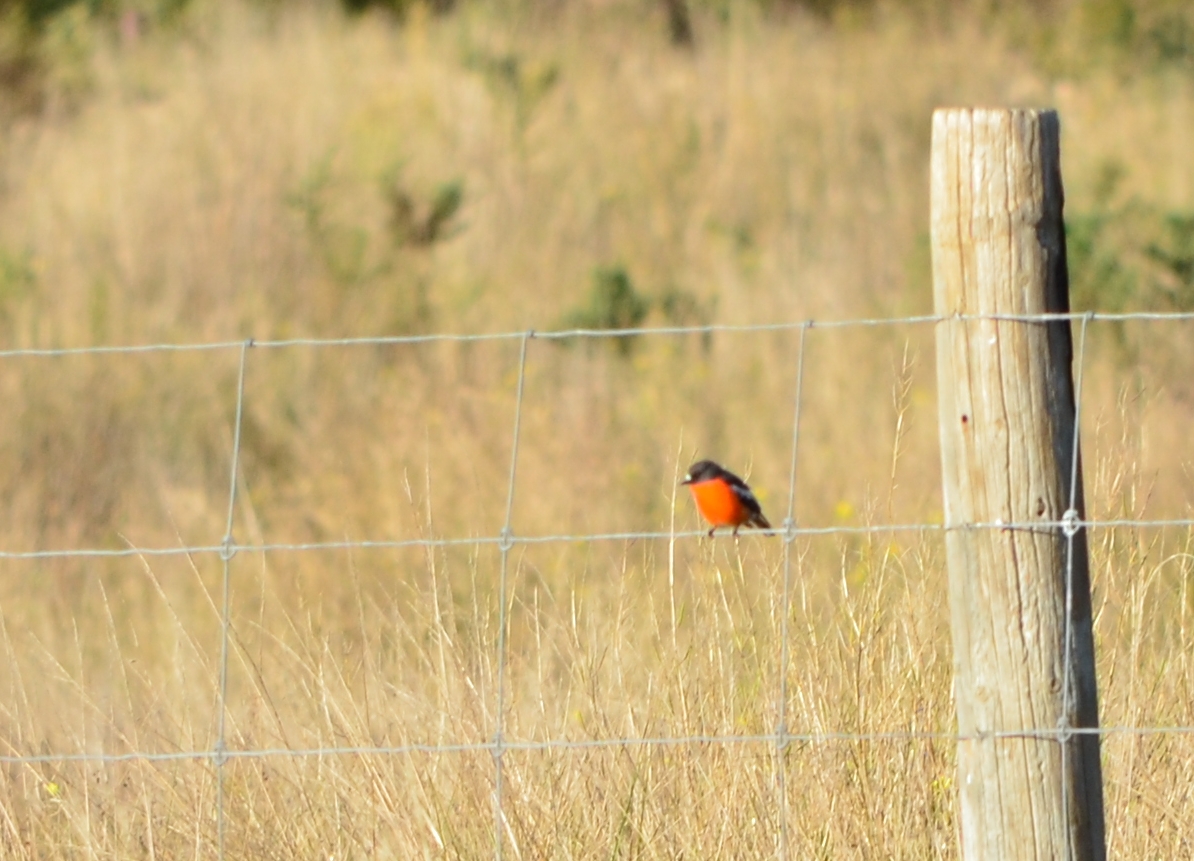
I have had a visitor the last few mornings.  A beautiful red robin.  Every time I race back inside to get my camera she flies away. 


I managed to stalk her a bit and by using my telescopic lens got this burred pic.  Still, it's better than nothing.


Monday, June 25, 2012

A project finish

Actually I am happy to say I have finished a couple of bags.  But I am only showing one today as I want this to be a quick post not a novel.


Love the colours of pink and chocolate!  This bag was a joy to make.  I used cotton for the outer fabric and the lining.  For the interfacing I used some soft cotton flannel.  It gave the bag some shape without making it too stiff and rigid.  I used the Phoebe pattern from  Artsy Crafty Babe.


The lining has a inserted zipper.  (not part of the Phoebe bag tutorial).
I also added the lobster claw thingy to attach my keys to.


You may have noticed I haven't been blogging much.  Well I am going to be honest and say I have lost my blogging mojo.  Its got to the stage where I am afraid to do a post!  Yes strange I know. 

So to try and combat this I am going to do short posts for awhile and hopefully two or more a week.  I haven't decided on which day of the week this will be.  It all depends on when I get regular free time and access to my own laptop.

Back soon with another bag finished.

Friday, May 25, 2012

Origami Bag tutorial

I would like to thank the kind lady who let me know that one of the tutorials I posted a link to online no longer exists.  If you want to see the first bag I made like this one it is here.

After looking for another tutorial to link to and not finding one I decided I had to make my own.

I now have a new appreciation of the generous people who make tutorials and post them on their blog.  Thank you. Tutorials are not as easy to do as I thought they would be.

Firstly I learnt I should have used a light plain fabric and clear contrasting thread so that everything was easier to see.  So bear that in mind when you read my tutorial.  Also that I have no time to do it again right now because I promised the kind lady I would make one as soon as possible.  It has already taken a week of slaving away at the tutorial at night after work when I was already exhausted from talking to clients all day.


What You Need

40cm x 40cm (16") of exterior fabric
40cm x 40cm (16") of lining fabric
two buttons
cord (or ribbon like I used)

Instructions


Step 1:

Cut out one 40cm x 40cm square from both exterior and lining fabrics.

Please be more accurate than I was.  If you think you may not be perfectly square when cutting out, then stay away from spotted fabric!


Step 2:

Pin and sew the two squares together.  Right sides facing.

I used a 1cm seam as you can see (above).


Leave a gap of about 5cm to 8cm in one side so that you can turn right side out.

See my fingers.  Am I doing bunny ears or the peace sign?


Step 3:

Clip all four corners to reduce bulk.


Step 4:

Turn right side out and press.

Ensure all four corners are pushed all the way out and are square.


Step 5:

Fold in half.


Step 6:

Fold the sides over until tip of triangle is flush to the other edge.

(This is where using a light coloured fabric would have been more useful to show what I am talking about!)

Fold the top corner down.  Press entire project.


Step 7:

Draw lines on the crease lines.  The lines on the sides will be your stitching lines.


Step 8:

Fold over the top and bottom flaps to the line marked and pin.

Sew across about 1/2" to form your casings.


My casing.  If I didn't use spotted fabric you would probably not notice it looking so uneven.


Step 9:

Sew the sides.  Follow those lines you drew in step 7.


Just wanted to show that not only do I cut wonky uneven squares of fabric but I sew wonky straight lines of stitching.

No don't do this.  Sew yours straight.


Step 10:

Origami fold the sides in to look like mini squares.


Step 11:

Fold the top flap of mini square over as in photo on left.


Step 12:

Stitch a button onto each side. 


Step 13:

Stitch an embellishment to the front.

After making a couple of flowers for the front that all seemed too big, I got lazy and went ahead and used one.  Personally I think a smaller flower would look better.


Step 14:

Pull your cord through the casings and voila!  Your done!!!


Hope you like this tutorial and can follow my instructions well enough.  If you can't my email is always a few clicks away.


Sunday, May 6, 2012

Weddings are  generally not my favourite event to go to, though I do prefer them to funerals.  I find church weddings are stiff and too formal.  So imagine my pleasant surprise to witness a beautiful wedding in a cathedral called St Francis Xavier that had fun, love and laughter.  A happy priest telling jokes and the bride and groom's close friends having participating roles in the service.  I cried a little. The bride's mother tells me I was the only person who cried.  I assured her that they were tears of joy.


This is not the best of wedding photos but about the only one I managed to take without a bubble up somebody's nose.


Spot the bubble!

To be fair to family I will embarrassingly expose myself on my blog.

before a few drinks at hens night

after a few drinks!  
My sewing mojo has managed to finish off a small childs tote that has been hanging around unfinished for months.  I feel so happy to finally finish off a project that started off exciting and ended up blah.


Next sewing finish is a neck pillow I made using a pattern from the book called "Sew Darn Cute" by Jenny Ryan.  That book is so darn cute and the projects in it are all on my "must do" list. 


Top of pillow was made using cotton scraps stitched onto a piece of flannel.  Then I traced the pattern onto this and cut out along with the backing piece which was from a child's dress made of soft chenille fabric.  Looks gorgeous and feels so comfy.  It is so mine! 


Mothers Day is in a week.  Do you think I will have enough time to make a couple more for the lovely ladies in my life?  (A little voice of reason is telling me no because stuffing the pillow is such a time sucker).

Thanks for reading.  May you all be blessed with beautiful weather this week.


Tuesday, May 1, 2012

I have been attempting to write a blog post for ages.  I have lost count of the many times I logged in all ready to do a post and then been interrupted and lured away from the keyboard!

So lets be quick:


Made a fabric flower for no reason at all.  Turned out to be a blessing because I got asked to decorate church pews for a wedding.  No not with the above flower.  I made some white ones.


I made eight.  Well I stitched the circles together while my friend Min cut out all 12 circles for each flower.  Cutting out the circles is the hardest and most boring bit I think you will agree. Tutorial is from Precious Little Poppets.  Link here.


Some netting and the pew decorations are done.  We had about 2 weeks notice before the wedding as the bride forgot about the little details.


The Gnomes have eyes!  One (red hat) has a new home too.  Link for tutorial is on previous post. (sorry about being lazy.  Link to Gingercakes blog here.


The gardening job I mentioned last post about my friend coming over to help..........  well we had good intentions and did do some mowing but soon did more drinking.  Mowing and drinking do not mix.  I should think.  I don't actually know because I don't drink and mow. I'm not an idiot! lol

Hey!  I got a post done!  Yippee and wish my long suffering readers all the best wherever you are.

Thursday, March 29, 2012

I am a sewing crazy and I need help!!!

I have been sewing like mad for the last few weeks and guess what?  I have barely finished a single item.  What exactly do you call this condition? What does it say about me that I lose interest too quickly or am easily distracted by the next great project that comes along?

I also found I couldn't blog about a project until I finished it which made for a very sad and sorry looking blog indeed!

I have decided to try and post about all my projects right from the "Cutting Of The Fabric" stage and seeing if  this helps. Not only with finishing WIPs but getting a blog post out every couple of days at least!

As a craft blog reader myself I actually like seeing the whole journey of projects being made and well as the end result.  So somebody may actual enjoy my posts or at the very least find it useful.


They aren't actually finished yet as they have no faces:(

To be totally honest I am too scared to paint their faces as I am so messy at it and don't want to ruin the cute little things.

Tutorial was found here and I would like to say thank you to Virginia Lindsay, creator of Gingercake Patterns and the blog Gingercake for sharing her gnomes with us.  I found them quite adorable.

 Well bye for now.  I would like to finish a neck pillow as its nearly done!  Alas I also have a friend coming over tomorrow to help me landscape my front garden and I have to do some preliminary work first.

Also try and catch up with another friend whose daughter is getting married and I have volunteered to help her with the tasks she has to do for the wedding, like make the guest gifts and table decorations.  She also had to alter her daughters wedding gown and re sew the intricate lace and beading.  Now she has to give it a gentle wash.  I don't want to help her with THAT too much as all hell will break loose is something happens to the dress!  I will give her emotional support and thats about all! lol